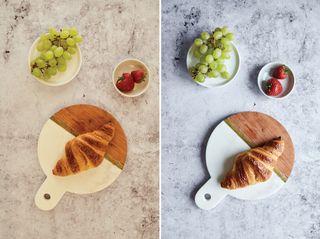
Working with natural light has one great advantage: it gives photography a unique and natural atmosphere that is difficult to recreate in the studio. But daylight is anything but uncontrollable and, used correctly, it can have a great influence on the overall look and visual language of your image.
To control the light and shadows, it is necessary to remember that the quality of light changes throughout the day. If you photograph under an overcast sky, in the morning or in the afternoon, the light creates soft shadows and reflections, whereas the midday sun tends to create more extreme effects. The harsh incidence of light emphasises the shadows and produces graphic and unnatural results.
Food photography offers the opportunity to learn and understand how to use light in a natural way. In this genre, many photographers work with daylight, as it makes the food more appetising and realistic looking but also shows off the special features in a stylish way. Low ISO settings, wide aperture and long shutter speeds make it possible to get the best results, even when shooting in lower light.
With products however, don’t try to increase the brightness by working with extremely large apertures. This affects the depth of field and reduces the sharpness of the elements. Instead, use a tripod and a longer exposure to balance the light. Learn the optimal camera settings, perspectives and compositions to get the most out of daylight and you may not need to work in the studio anymore.
Before and after


Shooting steps
1. Find your spot

Build your set close to a window and avoid extraneous light sources. In this way, you avoid yellow tinges and elements will benefit from soft light reflections and shadows. If needed, use a reflector to brighten up the shadows.
2. Think about light

Try out different arrangements of the food to analyse the individual effect of the light and find the best perspective. A 45° angle shows off the main features while
a bird’s eye view provides a wider overview.
3. Secure your camera

When you have decided on the perspective, mount the camera on a tripod to capture maximum light when working with long exposures. To reduce the risk of movement, work with the built-in camera timer or use a remote shutter release.
4. Switch to manual

To master natural light, take full control of the settings. Use low ISO values and correct the overall brightness by varying the exposure times. Select the smallest aperture and increase it until the desired image sharpness is achieved.
5. Find your style

Try a range of different backdrops, keeping an eye on how each one affects the visual appearance of the main elements and overall atmosphere. Focus on both texture and colour and make sure to bring out the details as much as possible.
6. Use negative space

Sometimes, less can be more, so don’t try to add too many components. Instead, focus on the main subjects to enhance their visual properties. Negative space can help your composition, the eye focuses on these and balances the image.
More tutorials
- Ditch your tripod – try handheld HDR instead!
- Long exposure flash photography can give you mind blowing results
- Street photography: how to remove distracting elements with long exposures
More about food photography


